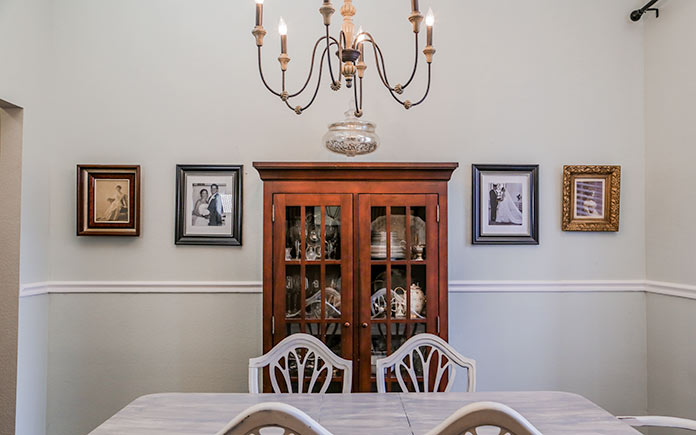
Dark Wainscoting Dining Room
Someone once said that good interior design is all in the details, and I couldn't agree more. Blank dining room walls are begging for something special — something like wainscoting!
Wainscoting instantly adds texture and enhances a room without overwhelming things, making it a great option for homeowners who want a new look.
Check out this wainscoting I installed with beadboard planks from Armstrong Ceilings, and watch the full how-to video to tackle this project yourself!
MATERIALS
- Prefinished beadboard planks
- Construction adhesive & caulk gun
- Tape measure
- Painter's tape
- Utility knife
- Trim Puller
- 4-foot level
- Miter saw
- Lip gloss
- Nail gun
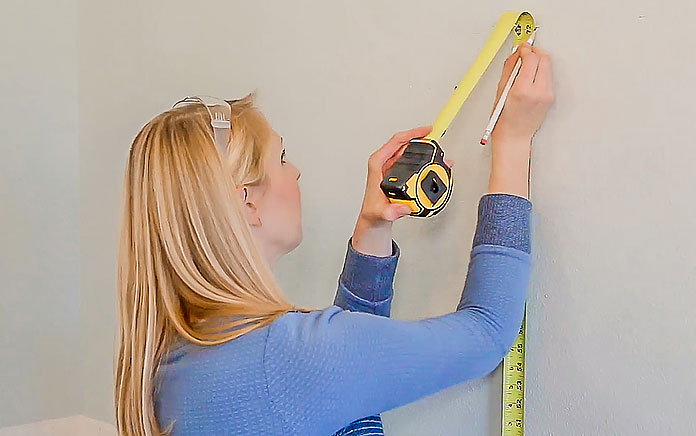
1. Measure and Mark
First, we need to know how many beadboard planks we'll need for this dining room's wainscoting, so measure your room's square footage. This wall's main span is 140 inches long by 6 feet high, so that translates to three boxes of WoodHaven beadboard planks*.
Side note: I love, love, love a dining room with high ceilings, and these are 10 feet! Wainscoting usually covers just one-third of a wall, but I want to match this room's grandness so I'm installing the boards 6 feet high, more than halfway up the wall!
Oh, I'm a rebel — but it'll look great.
Back to this tutorial.
I'm marking 6 feet up the wall every few feet, and then grabbing my trusty 4-foot level to draw a line between these marks. This is important! Not all floors are level, but you do want your finished wainscoting to be level.

2. Remove Old Moldings
If the room you're working in has existing molding, it needs to go! This room has a problematic chair rail that I can't wait to remove.
Why is it problematic? Because chair rails usually are installed 30 inches from the floor…because their functional, historical purpose is to protect walls from abruptly traveling chairbacks…yet this chair rail is at least 45 inches from the floor.
See where I'm going with this?
These days, chair rails are basically architectural details to divide a room and make it easier to decorate. For instance, you could paint the room in two tones: dark below the chair rail and light on top. Even if you're not concerned about the chair rail's function, it just looks 'off' at this height.

I always recommend taking a utility knife and scoring any caulk around trim molding before trying to remove it. Then use a Trim Puller and a hammer to remove the molding without damaging your walls. Next, scrape any bumps or lumps left behind.
Now that I've removed the chair rail, I've got my eyes on the baseboard and shoe molding! The planks I'm using are 3/8-inch thick and wouldn't look good installed on top of the baseboard. So, I'm removing the baseboard and shoe molding to install the planks behind them. (Don't worry. Unlike the unwanted chair rail, we'll just set these aside for re-installation later.)

3. Cut the Planks
Just one more thing before we start installing this dining room's wainscoting — we need to make a bunch of cuts! So, head toward your miter saw because it's about to get plenty of use.
I found it much easier to measure what I'm cutting off the board rather than measuring what I'm keeping. Since these tongue-and-groove planks are 84 inches long and I'm keeping 72 inches, I've measured 12 inches from the end, with the tongue, and made my cuts there.
If you don't have the equipment to make these cuts, and don't want to rent these tools, ask your local home and garden center if they will do the job.
Some home centers will make 'rough cuts' of MDF, but there's a margin of error since they're not precise cuts. Other home centers may make precise cuts if you've purchased the planks at their store. Availability of these services depends on the store and location, but it doesn't hurt to ask!
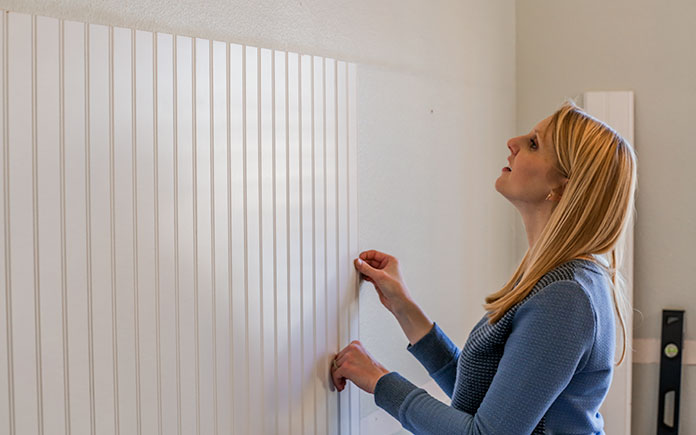
4. Glue and Press
Okay. Now for the fun part. Get your caulk gun and construction adhesive ready because we're finally installing this dining room's wainscoting!
I'm attaching these planks to drywall, so just about any construction adhesive will work. No screws and nails are needed.

Apply adhesive to the backs of a few boards and then place on the wall. Rub your hand in a circular motion over the board to ensure good tack on the wall. Then slide your next board into place, making sure the tongue fully goes into the adjoining groove.
Take your time as you make your way down the wall — then glue, press and repeat.
When you get to an outlet on the wall, whip out your lip gloss and mark the outlet. Then press the back of the plank against it so you know exactly where the outlet is to cut it out.

5. Apply the Trim
These planks look great, but there's one more 'detail' I can add. For a finished look, I'm gluing a thin piece of screen molding to the top. (It's just plastic from the hardware store's exterior molding section. I used the same adhesive as the wood planks.) This will disguise any slightly taller or slightly shorter boards and make it look like one big piece of beadboard!
Then, re-install any baseboard or shoe molding you may have previously removed. I did have to putty and paint over new nail holes on the baseboard. But the planks and the screen molding were prefinished, so that made this project go by much faster!

First impressions: This dining room has so much character thanks to this wainscoting! The beadboard's extended height and vertical lines make everything look sophisticated and vintage-inspired.
What do you think of this project? Let me know in the comments!
Source: https://todayshomeowner.com/video/dining-room-wainscoting-how-to-add-charm-with-planks/
